- Bots have been an integral part of CS:GO since a long time, but sometimes it is better to practice without them in the server.
- When practicing utility lineups, rotation timings, and other such things, all the bots from the server can simply be kicked.
- Read on to find out how to kick all the bots from a custom server to practice peacefully without any hinderance.
It is not too complicated to kick bots in CS:GO when you just want to practice in peace. Despite them being an integral part of the game since time immemorial, there are times when you just want to kick them all out of your custom practice server and do your own thing. Yes, bots have been long used as a method of practicing against especially with new players who are just starting out. But some times they can be really annoying, joining either team automatically, auto-balancing the teams, and all sorts of other irritating things. At times like these, a bunch of console commands is all it takes to get rid of them.
So let’s take a quick look at how you can kick these bots from your custom CS:GO servers and continue practicing your utility lineups, rotation timings, pre-firing certain angles, and other such things. However, make sure to these off as well otherwise you might not be able to practice against the Valve upgraded bots again.
RELATED: How to Kick Yourself in CS:GO (2021): Complete Guide
How to Kick Bots in CS:GO?
The earlier version of the Counter-Strike bots used to be a nuisance and quite annoying to practice against, with the players usually outgrowing them in skill pretty quickly. But since Valve improved them in Sep 2019, the bots have really stepped up their game and practicing against them in private servers has never been better. However, there are times when you simply want to do your own thing and it is then that these bots start to act like pests.
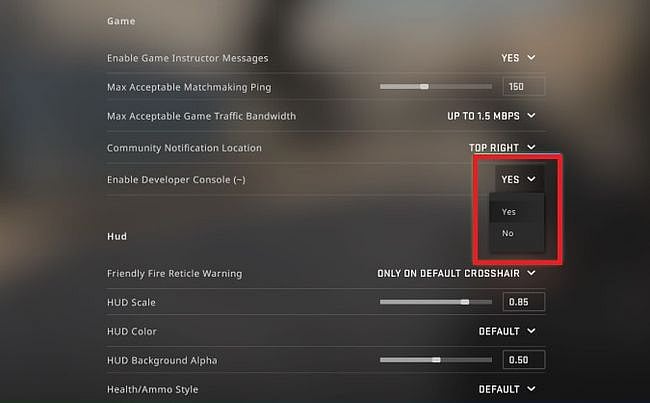
Well, you can get rid of them by simply entering a few simple and straightforward console commands. But before that, you need to check if your CS:GO command console has been enabled or not. To check this you simply need to press the default tilde key ‘~’, if a console pops open then we can proceed to the next step, otherwise you need to activate it by following the steps mentioned below,
- First open your ‘Setting’ in CS:GO and then go on to further enter ‘Game Settings’.
- Scroll down to find the ‘Enable Developer Console’ option and then choose ‘Yes’ to activate it.
- Once done, you would be required to restart CS:GO once.
- After CS:GO opens again, on the ‘Main Menu’ itself press ‘~’ this button to open the CS:GO command console.

RELATED: CS:GO Console Commands - Most Useful Ones in 2021
Now, having activated the CS:GO command console. Let’s see in detail which commands need to be input by you and what is the function of each one of them,
- The first step is to type the console command ‘mp_limitteams 1’. This will automatically ensure that once the bots are kicked out of the custom server, they do not rejoin the game again.
- The second step is to type the console command ‘mp_autoteambalance 0’. This will prevent the bots from auto-balancing teams.
- The third and final step is to type the console command ‘bot_kick’. This will prevent simply kick out all the bots present on the server. This command can be further refined to target bots on either side by typing ‘bot_kick ct’ or ‘bot_kick t’.

Depending on the type of practice that you want to undergo, it can be decided whether the bots are required or not. It is recommended that when practicing stuff to enhance your individual skill or playing against some other users, you can simply remove all the bots. Otherwise, you can add them back and train executes, how to clear a site, and other such things.
